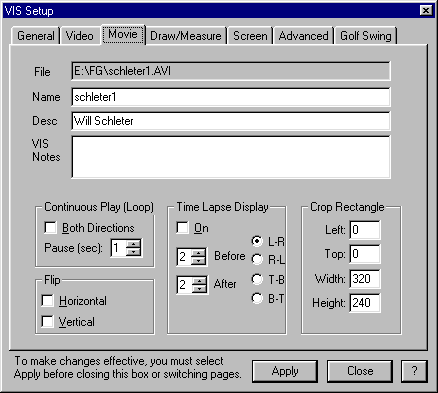
The Movie Setup dialog box gives allows you to add information about the active movie and to set system defaults for functions that affect movies and movie viewing.
The File: line is grayed out and shows the movie file name and complete path where it is stored in the computer.
The movie name that appears as the window title is shown in the Name area. You can change the name of the movie in this box. However, in the case of a movie you have retrieved from a file, unless you save the movie again, it will not retain the new name.
The description for the movie and notes can be added in these boxes. These notes will be saved with the movie and show up in the title block for selected movies in the VIS Open File/Library dialog box where archived movies are opened.
The Continuous Play section of the Setup/Movie dialog box sets the parameters for loop playing of the movie. Looping is toggled on/off on the movie toolbar. Looping plays the movie continuously. If Both Directions is checked, the movie will play from front to back, then back to front, and then repeat this cycle. If left unchecked, the movie will loop from front to end, and then repeat the loop from front to end.
The Pause (sec) time is the number of seconds VIS will pause between loops.
Will there is no labeled key for looping without using the toolbar??? This cant be true…
Will, what does this do? I supposed it is different from Movie/Flip statements? If not, I suggest it be removed (unless theres something I dont know)
The Time Lapse Display section of the Setup/Movie dialog box controls the display of time lapse viewing. Time lapse viewing allows you to view a multiple sequence of frames. Time lapse viewing is based on a principle of viewing frames before and after the frame of interest.
The number of frames shown before the frame of interest is set in the Before box, and the number of frames shown after is set in the After box. The L-R, R-L, T-B, and B-T buttons set the frames in order from left, right, top, and bottom.
Time lapse can be turned on from either
•
Clicking on the On box in the Setup/Movie dialog box
•
Clicking on the Time Lapse icon on the Movie toolbar
•
Selecting Ctrl + T on the keyboard (an on/off toggle)
•
Selecting Movie/Time Lapse from the main menu.
The Crop Rectangle section of the VIS Setup/Movie dialog box sets the initial size and location of the cropping rectangle. This rectangle can be changed by dragging its borders with the mouse.