Video - capturing video from a VCR or Camera
Video - preparing for capturing video
Allows selection of the current video capture device if there is more than one device available on your system. This entry should show the video capture driver name and version.
The capture device settings area displays a small preview window of your current video input and provides capture card specific controls that allow you to control brightness, contrast, the input signal, and the size of the video-in window.
Video capture card specific
The type of video input your are using on your capture card (this is which plug you are using) is selected with the S-video/Aux/Comp Vid buttons. The standard stereo type plug is a Comp Vid (composite video) signal. S-Video uses a small round plug with several pins.
The type of signal is determined by your camcorder or video tape machine. In the United States, the signal is most likely NTSC. If your signal plays into a standard television, it is NTSC.
The Color settings change how your video appears through the video capture card. The video will be captured as it appears after adjustment with these settings. To play your movie clips with the original color settings, you must reset them here. Your video card captures exactly what shows on the screen.
Pressing the Default Button returns the Color settings to their original values.
Video Capture Source Dialog Box (ATI)
The Video Format dialog box controls the size of the video capture image and the format of the color display.
Will, please recommend one or the other of these with a sentence about the difference… card specific
Video Capture Format Dialog Box (ATI)
Only enabled if your capture card has additional display setup options. Not used on ATI capture devices.
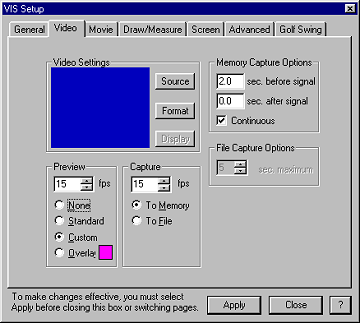
The entry in the Preview section of the Video Setup dialog box controls the frame rate of the video preview window. This rate is independent of the actual frame capture rate. You may see better performance from your system with this rate set at 15 frames per second (15). Most video plays at a rate of 30 fps, and with 15 fps, you see every other frame - usually adequate for judging the video clips to capture.
Will, can you expand on the None, Standard, Custom, and Overlay selections…
The entry in the Capture section of the Video Setup dialog box controls the frame rate of which the movie clip is captured. For most applications, you want to capture 30 frames per second, especially if the motion is fast or you need to capture a particular frame of motion.
Generally you will capture to your computer's memory. Capture To file will capture the movie will save the movie to a temporary file as it is being saved. However, writing to file may affect the capture process and cause frames to be dropped.
Memory capture options set up the seconds of video to capture. Anytime the video capture is turned on, VIS monitors and stores the incoming video in internal memory. When you capture a video, you are simply transferring it from internal memory to the screen. The memory capture options tell VIS which parts and how much of the buffered video to save when when you press the Enter key.
To capture your video, you set the number of seconds to capture before the signal (pressing Enter), and the number of seconds to capture after the signal.
It is difficult to know exactly when someone is going to start a motion, so we recommend that you set VIS to capture a set number of seconds before the trigger signal. For instance, a golf swing is usually less than three seconds long. So, if you set up VIS to capture 3 seconds before and 0 seconds after a signal, you can press Enter at the end of a golf swing and VIS will be able to record the entire swing with a single keystroke.