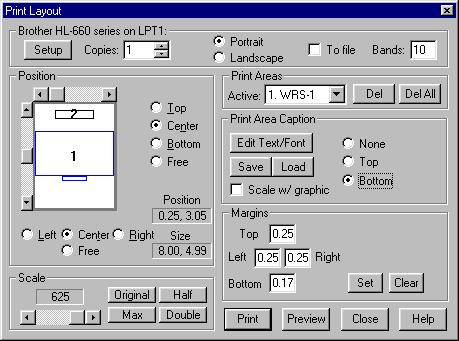
The Print Layout dialog box allows you to assemble and arrange multiple images and titles and then print them.
Print areas can be moved around on the page by first selecting the area to be positioned by either clicking on it in the preview area or by choosing it from the list of print areas. Once a print area is selected, you can drag it with mouse or use the scroll bars to move it. Accurate positioning to the center or extremes of the paper can be made by selecting the appropriate positioning buttons.
After print areas are loaded, the page can be previewed selecting the Preview button. Previewing is a good idea for verifying how your printed page will appear.
To delete a single print area, select the print area to be deleted and click on the Del button. To start a fresh page, click on the Del Al button to delete all print areas.
The currently selected printer is shown as the title of this portion of the box. To select a different printer, click the Select button to pop up the Windows™ printer selection box. Printer options can be selected from the Windows™ printer dialog box.
The currently selected printer is shown as the title of this portion of the box. To select a different printer, click the Select button to pop up the Windows™ printer selection box. Printer options can be selected from the Windows™ printer dialog box.
Copies allows you to select multiple copies of the current page to be printed. Selecting multiple copies saves time because the computer only does the printing calculations one time, regardless of the number of copies to be printed.
Portrait or Landscape page orientation can be selected. The selected page orientation is shown in the layout Position part of this dialog box.
The To file checkbox can be selected to redirect the print output to a file instead of printing immediately. You will be prompted for a file name when you generate the print. This means that the page to be printed is saved as a file for printing at another time. For details on how to print these files, see Printing in Batch in Section 2, Using VIS.
The Bands checkbox allows you to control whether or not the system "bands" the image internally while generating a print. Should be left checked unless you are having problems printing.
This area simulates the current layout of the page you are setting up. It shows you a blank page that is oriented either portrait or landscape as set in the printer selection part of this dialog box. The page you want to print can be assembled in this box.
To move or resize an image, first select it by clicking on it with the mouse. You can move it by either dragging it or using the buttons along the bottom and right side of the layout box to set the image's position. The size of the image is set in the Scale box.
Each image has a number that represents it's print area number.
The gray border around the outside of the layout area depicts the margin settings.
The top/center/bottom/left/right/free buttons on the bottom and side of the layout area position the active print area.
Print areas can be selected with the mouse and can be moved by dragging or by using the scroll bars.
The current print area position and size are shown in inches and measured from the top left corner of the paper.
The scale of the active image is controlled by the scale buttons and the scroll bar. Use the buttons for standard sizes and increments, and use the scroll bar to freely change the size of the print area.
Up to ten print areas are available to position images or groups of images on the paper before printing. Captions entered in the VIS Print dialog box become part of the print area.
Will, did area 10 become the logo area?
The current print area can be selected by choosing from the drop down list box. Unused areas cannot be selected.
The Delete button deletes the current print area
The Delete All button deletes all print areas and exits the print setup box.
Print Area Caption selections allow you to create a separate title for the entire page. This caption is created by selecting the Edit Text/Font button. This selection allows you to select the font type and size and the input the caption text.
Allows you to enter text that will be used as a caption for the print area. The text entry box is identical to that used when drawing text on a movie clip. Link to that help
You can also have a library of standard text and titles for quickly adding captions. An example of standard titles is to create notes of common problems or descriptive titles of the skill being printed. You can select them from the Note Library to add them to the page.
Scale w/graphic forces the caption to be the same scale as the active print area. If unchecked, the caption will remain the same size while the size of the image is changed.
This area sets the margins for the currently selected printer and paper.
The smallest allowable margins are automatically determined by the selected printer's internal settings.
You must press the Set button for the new margins take effect.
The Clear button sets the VIS margins to the printer's default minimum margins.
Clicking on the Print button sends the current page to the printer. Depending on the selected printer, color/black & white settings, and the complexity of the print areas, this operation could take several minutes.
Pressing the Preview Button will generate a reduced VIS image of the current print layout. It is a good idea to preview complicated pages before printing with this feature.
The Close button saves the current print layout and returns you to VIS. The current settings are saved.
To add additional images to your page, Close the print layout page to return to VIS to set-up and print the next image.