Now you have captured your video and created a movie clip of the motion you want to study. The next editing task is to crop the movie to remove the surrounding background that isn't really part of your scene.
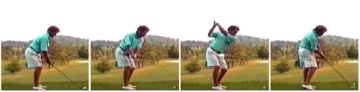
Cropping is important because it will help make the activity appear as large as possible in the movie layout. An example is shown below. These two pictures are printed movie layouts of the same movie. The only difference is that the first layout was made from the uncropped movie and second was made from a cropped version of the movie. In the second picture, the background that wasn't part of the golf swing was cropped from viewing.
As you can see, the second picture is better because the golfer is fills each frame and appears larger when sized to the width of the page.
To crop your movie clip, you reset its borders using a cropping rectangle. To start a cropping rectangle, use either
When you make this selection, the borders of your movie become active and you can drag them with the mouse. Play the movie and drag the movie borders to positions that cut out any extra background.
When you are satisfied with the new movie image borders, then crop the movie by either pressing the W key or selecting Movie/Crop/Uncrop.
VIS keeps the entire movie image in the background, so if you want to reset the borders and undo your cropping, use either: