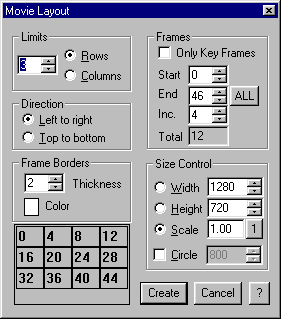
Layout is primarily used in two ways. First, if you typically set key frames that show the important frames of the movie, you will most likely set Only Key Frames to on in the Frames section. Then you can set the display by specifying the rows or column in the Limits section.
The second way to use Layout is to specify either the number of rows or columns in the Limits section and then altering the Start, End, and Inc. values in the Limits section of the box to achieve a suitable image.
The layout of the image you are generating appears in the lower left hand corner of this dialog box.
The Frame borders thickness determines the width of a line that separates each image. The color of this line is set by licking on the color box. Using a white line on white paper is effective for separating images without causing a distraction.
Size Control lets you adjust the size of the images. Usually, you will want the Scale option selected with its value set to 1.0 so that the images will print at the best possible resolution. Specifying the width or height of the layout will automatically calculate the required scale based on the number of rows and columns, and is useful for generating images that are of a consistent size. Using a scale of less than 1.0 may be useful for very large layouts which would consume too much memory when created full scale.
The Circle selection displays the images in a circular arrangement with the specified outside diameter (in pixels.)