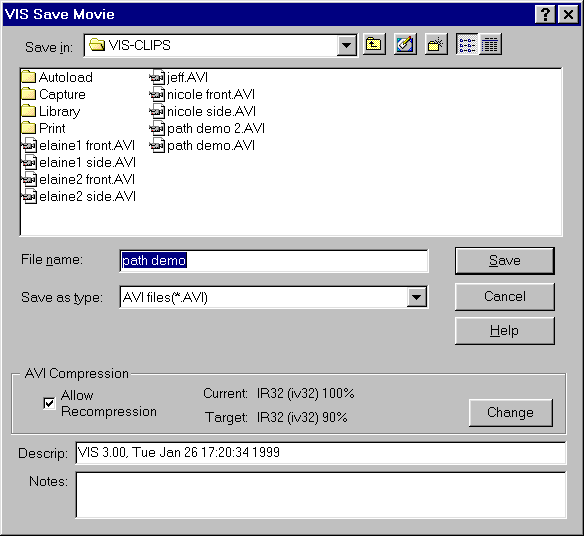
The Save File dialog box combines a standard Windows save box with VIS specific extensions.
To save a movie clip as a file for future reference, use the VIS Save Movie dialog box. The function can be accessed by:
•
Selecting File/Save File on the main menu,
•
pressing Ctrl-S on the keyboard, or
•
selecting the Save File icon on the main toolbar.
The VIS Save Movie dialog box allows you to save movie clips as files, to set the type of video compression, and to add a description of the video to the file.
To save an image a file for future reference, use the VIS Save Image dialog box. This function can be accessed by:
•
Selecting File/Save File on the main menu,
•
pressing Ctrl-S on the keyboard, or
•
selecting the Save File icon on the main toolbar.
The VIS Save Image dialog box allows you to save images as .BMP or .JPG files. Images are saved exactly as displayed with any sketching that is currently displayed being permanently added to the image.
The Save Movie dialog box is a standard Windows browser that allows you to select the directory you where you want to save your movie clip. Using the browser, find the directory you want to use, type in the name you want to call the movie, and click the Save button.
The Save File Browser always returns to the last directory to which a file was saved. Thus, the Save File directory may not necessarily be the same one that the file came from when the directory has been changed while saving another movie file. This feature can be convenient if you are opening files in one directory, changing them, and then wanting to save them to a different place.
VIS only saves movies in AVI format. Regardless of the extension you type in, the movie format will be AVI. Filenames must not use a . (period). The *.AVI extension will be automatically added as long as the Save as type box is set to AVI files (*.AVI).
AVI compression allows you to reduce the size of your movie file. Depending on the compression routine selected, the quality of the movie may be affected. To select a video compression routine, click on Change in the AVI Compression section of the VIS Save Movie Dialog box. You will see the AVI Compression box, and can choose your compression routine.
The Intel Indeo® Video R3.2 routine that appears by default provides the best combination of quality video and a movie file that can usually be read by other computer systems.
The Cinepak Codec® by Radius compression routine allows you to compress the color movie clip to black and white, reducing file size and sometimes producing a more functional movie.
A word of caution: Once a movie has been compressed, you most likely will create an unusable movie clip if you compress it a second time.
Will, can you explain the Allow recompression checkbox here with regard to saving something a second time - for instance, you might save a movie and then save it again with key frames. If this box is checked, will it further reduce quality of the movie? I also think the help button should address recompression.
The Descrip: and Notes: entry boxes allow you to type in a description of the movie clip and any notes about its content. This information is useful for recording any special comments about the movie clip. The information about movie clips can be viewed from Windows™ by using My Computer to find the movie file (*.AVI) and then clicking on it with the right mouse button and looking at Properties.
The date and time that the movie was saved and the software that created it (VIS) are automatically saved with the movie file. The Descrip: entry can be used for the name of the individual or the skill being demonstrated. The Notes: entry can be used for any extra description of the movie clip such as the location or a special comment about good or bad things to notice about the skill execution.
Desc and Notes are added to a movie in the Edit/Setup/Movie dialog box.